
Keeping your home in top shape doesn’t always require major renovations. In fact, some of the most important protection comes from something small yet powerful, caulking. Over time, seals around windows, doors, bathrooms, kitchens, and exterior joints begin to wear out. When that happens, moisture can sneak in, energy bills can rise, and structural damage can quietly develop. That’s why annual caulking maintenance is essential for every homeowner.
In this complete guide, you’ll learn how to perform proper home caulking inspections, identify when caulk repair is needed, and understand when recaulking or full caulk replacement is the better option. Whether you prefer DIY solutions or professional help, this guide will walk you through everything in a simple, practical, and easy-to-follow way. Let’s dive in and protect your home the right way.
Why Annual Caulking Maintenance Matters
Annual caulking maintenance helps protect your home from moisture damage, air leaks, pests, and energy loss. Because caulk naturally expands and contracts with temperature changes, it gradually loses flexibility and adhesion. As a result, cracks and gaps form over time.
Additionally, proper sealant maintenance improves indoor comfort. When the seals around windows and doors remain intact, your HVAC system runs more efficiently. That means lower energy bills and a more consistent indoor temperature year-round.
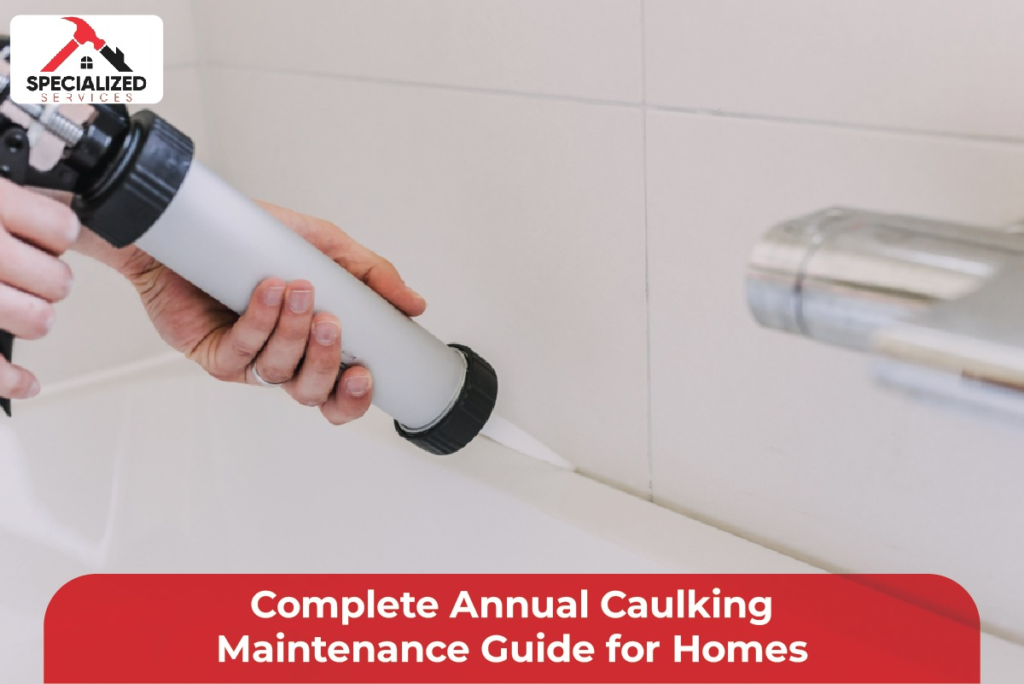
Understanding the Basics of Home Caulking
Home caulking is the application of sealant to fill gaps, cracks, and joints in various areas of the house. It is commonly used in kitchens, bathrooms, around windows and doors, siding joints, and foundation seams. Because these areas are vulnerable to moisture and airflow, proper sealing is critical.
There are different types of caulk available, including silicone, acrylic latex, and hybrid sealants. Each type serves a specific purpose. For example, silicone works best in wet areas, while acrylic latex is often easier to paint and ideal for interior gaps.
How to Perform a Proper Caulk Inspection
A thorough caulk inspection should be done at least once a year, preferably during seasonal transitions. Start by examining areas where caulk was previously applied. Look for cracks, peeling, shrinking, or discoloration.
Next, gently press the caulk line. If it feels brittle, soft, or separates from the surface, it likely needs attention. During inspection, pay special attention to exterior joints, windows, and bathroom fixtures, as these areas are most exposed to moisture.
For homeowners who want expert guidance, professional caulking maintenance services can help identify hidden issues. You can learn more about expert services.
When to Choose Caulk Repair vs. Recaulking
Not every problem requires full removal. Sometimes, a simple caulk repair is enough. If only small cracks or minor gaps appear, you may apply fresh sealant over the damaged area after proper cleaning.
However, if the caulk is heavily damaged, peeling, or moldy, recaulking is usually the better solution. This process involves removing the old sealant completely before applying a new layer. Proper surface preparation ensures long-lasting results.
If you want detailed guidance on removing old sealant, this helpful resource explains professional techniques.
Exterior Caulking: Protecting Your Home from the Outside
Exterior caulking plays a major role in protecting your home from rain, wind, temperature shifts, and insects. Areas such as siding joints, window frames, door trims, and foundation seams require durable outdoor-grade sealants.
Because outdoor materials are exposed to extreme weather, exterior seals tend to wear out faster than indoor ones. Therefore, annual inspection is crucial. When gaps appear, prompt caulk replacement prevents water intrusion and costly structural repairs.
Proper exterior sealing also enhances curb appeal and energy efficiency, making it one of the smartest preventive maintenance tasks for homeowners.
Step-by-Step Guide to Effective Caulk Replacement
When replacing caulk, always begin by removing the old material completely. Use a caulk-removal tool or a utility knife, carefully avoiding damage to surrounding surfaces. Clean the area thoroughly to remove dust, oil, and other residues.
After cleaning, allow the surface to dry completely. Apply painter’s tape if needed for straight lines. Then, load the new caulk into a caulking gun and apply a steady, even bead along the gap. Smooth the line using a caulk tool or your finger for a clean finish.
For additional professional insights about long-term seal strategies, this resource may be helpful.
Best Practices for Long-Lasting Sealant Maintenance
Good sealant maintenance goes beyond application. Proper surface preparation, choosing the right product, and regular inspections are all equally important. Always match the sealant type to the location and environmental conditions.
Additionally, avoid applying caulk in extremely cold or wet weather unless the product specifically allows it. Follow manufacturer instructions carefully. With the right approach, your seals can last for several years without issues.
Homeowners who want consistent upkeep can consider scheduling annual maintenance reminders. For general home care tips, this guide offers additional insights.
Common Mistakes to Avoid During Home Caulking
One common mistake is applying new caulk over old, damaged material without first removing the old material. This reduces adhesion and shortens lifespan. Always ensure surfaces are clean and dry before starting.
Another mistake is using the wrong type of sealant. For example, not all caulks are waterproof. In bathrooms and kitchens, choose moisture-resistant products to prevent mold growth. Careful selection improves both durability and appearance.
Professional Caulking Services vs. DIY Approach
Many homeowners can handle simple home caulking projects on their own. However, large-scale exterior work or hard-to-reach areas may require professional expertise. Professionals ensure proper surface preparation and high-quality finishes.
If you prefer expert assistance, specialized services are available.
Hiring experts can save time, reduce errors, and provide long-term protection, especially for full caulk replacement projects.
Final Thoughts
Annual caulking maintenance is one of the simplest yet most effective ways to protect your home. From preventing water damage to improving energy efficiency, proper sealing delivers long-term benefits.
By performing regular caulk inspection, addressing small repairs early, and scheduling recaulking when necessary, you can avoid expensive structural issues. Whether you choose DIY solutions or professional help, consistency is key. Start your maintenance routine today and keep your home protected year-round.
FAQs
1. How often should I perform caulking maintenance?
You should inspect your caulk at least once a year. However, high-moisture areas, such as bathrooms, may require more frequent checks.
2. What are the signs that I need caulk replacement?
Cracks, peeling, shrinking, mold growth, or gaps between surfaces are clear signs that full caulk replacement is needed.
3. Can I apply new caulk over old caulk?
It is not recommended unless the old layer is in excellent condition. For best results, remove damaged material before recaulking.
4. What is the best caulk for exterior use?
For exterior caulking, choose high-quality, weather-resistant silicone or hybrid sealants designed for outdoor conditions.
5. How long does caulk typically last?
Depending on the quality and exposure, caulk can last 5 to 10 years. Regular sealant maintenance extends its lifespan.